The 2025 Calendar Voting is now live! Click here to vote!
Exhaust Gasket Install
- HotRodZilla
- Veteran
- Posts: 4452
- Joined: Sat Jan 19, 2013 1:09 am
- FJRModel: 07 FJR-A
- Location: Albuquerque, NM
- x 13000
- x 6299
Exhaust Gasket Install
Ok everyone, I need some ideas or help, or suggestions or what worked for you if you've had to replace one of these.
This is the exhaust gasket installed at the end of the header pipes and the connection to the mufflers. Years ago when I went from the OEM mufflers to my Two Brothers pipes, the left side exhaust gasket came off with the OEM muffler and tore. I ordered a new one and it was impossible to install. I destroyed that one, trying to force it onto the header pipe.
After that I rigged kevlar exhaust gasket material, heat tape and hope, as a long term bandaid. That has worked pretty well but requires replacement every couple oil changes. I know when it is time to re-do that BS fix because the muffler begins to rotate in the mount. I am nearly out of Kevlar and I have half-assed this long enough. I have a new OEM gasket in my garage and need to install it.
Here's where I need help. I do not know how to stretch this gasket over the header pipe. Last time I tried, I destroyed the gasket. I don't know if you have worked with these before but they are not elastic at all. Basically some kind of soft compressed metal over a mesh support. They are somewhat squishy, so not a hard metal piece I can heat. It is nearly impossible to stretch without tearing it. Once it is torn, it is destroyed.
Do I need a specific tool? Can I use heat to make it expand and I just don't know it? Am I looking at this with a closed mind and not seeing the forest for the trees? I need help with this!
Thanks!!
- FJRoss
- Veteran
- Posts: 2677
- Joined: Sat Apr 14, 2018 7:41 pm
- FJRModel: 2011 FJR 1300
2017 BMW F700GS - Location: Fredericton NB (Canada)
- x 815
- x 2398
Re: Exhaust Gasket Install
I had to replace one when I switched from the Leo Vince that came on the bike to OEM mufflers. I don't recall having any problems with it. They are a bit fragile - I think they are graphite with a metal mesh inside. They are not elastic at all but you might be able to flare the leading edge a bit before installing. Maybe over a beer bottle or something like that...
At $25 each, you don't want to mess up a bunch of them!
Good luck!
At $25 each, you don't want to mess up a bunch of them!
Good luck!
HotRodZilla loved this
- raYzerman
- Contributor
- I post more than I ride
- Posts: 9674
- Joined: Mon Mar 18, 2013 10:49 am
- FJRModel: 2010 Honda CBF1000FA
- Location: Millgrove, Ontario, CA
- x 3129
- x 11581
Re: Exhaust Gasket Install
The problem is they are a line to line fit, no extra slack.... clean the pipe it's going on well and perhaps ensure no sharp edges on the pipe.... I've only ever done one, and it was a PITA. You'll just have to keep at it and have patience. If there was a lube that would work, use it very sparingly on leading edges only...... anti-seize??
HotRodZilla loved this
Keep yer stick on the ice........... (Red Green)
Duct tape can't fix stupid, but it can sure muffle the sound.
Duct tape can't fix stupid, but it can sure muffle the sound.
- HotRodZilla
- Veteran
- Posts: 4452
- Joined: Sat Jan 19, 2013 1:09 am
- FJRModel: 07 FJR-A
- Location: Albuquerque, NM
- x 13000
- x 6299
Re: Exhaust Gasket Install
The beer bottle flare is a good idea. I think if I can get the leading edge over the pipe, the rest will follow.FJRoss wrote: ↑Thu Jul 14, 2022 1:00 pm I had to replace one when I switched from the Leo Vince that came on the bike to OEM mufflers. I don't recall having any problems with it. They are a bit fragile - I think they are graphite with a metal mesh inside. They are not elastic at all but you might be able to flare the leading edge a bit before installing. Maybe over a beer bottle or something like that...
At $25 each, you don't want to mess up a bunch of them!
Good luck!
Both good ideas. I'll hit it with Scotch Brite and make sure it is smooth. The anti-sieze is also s great idea. I kept trying to think what to lube it with and all I could think of was either petroleum based, which will smoke or stink, or silicone spray. Anti-sieze may solve both if those if I just use a very small amount.raYzerman wrote: ↑Thu Jul 14, 2022 1:12 pm The problem is they are a line to line fit, no extra slack.... clean the pipe it's going on well and perhaps ensure no sharp edges on the pipe.... I've only ever done one, and it was a PITA. You'll just have to keep at it and have patience. If there was a lube that would work, use it very sparingly on leading edges only...... anti-seize??
- FJRoss
- Veteran
- Posts: 2677
- Joined: Sat Apr 14, 2018 7:41 pm
- FJRModel: 2011 FJR 1300
2017 BMW F700GS - Location: Fredericton NB (Canada)
- x 815
- x 2398
Re: Exhaust Gasket Install
Doesn't really matter what you use to lubricate it. Even a THIN smear of grease or Vaseline would be OK. It will burn off pretty quickly anyway.
Yeah, make sure there are no burrs or wire edge on the pipe...
As I said, I had to change one once but do not recall any particular drama.
Yeah, make sure there are no burrs or wire edge on the pipe...
As I said, I had to change one once but do not recall any particular drama.
HotRodZilla and wheatonFJR loved this
- gixxerjasen
- I post more than I ride
- Posts: 6022
- Joined: Thu Feb 21, 2013 5:50 pm
- FJRModel: 2007 Yamaha FJR1300AE
- Location: DFW
- x 5593
- x 9256
Re: Exhaust Gasket Install
Just remember, for safety reasons, you cannot do this with a full beer bottle. To get the best results, you really should be using a bottle that is very recently emptied.HotRodZilla wrote: ↑Thu Jul 14, 2022 3:22 pm The beer bottle flare is a good idea. I think if I can get the leading edge over the pipe, the rest will follow.
FJRPittsburgh, HotRodZilla, CollingsBob and 1 others loved this
YouTube Channel | My Blog
Current Bikes:2007 Yamaha FJR1300AE | 2016 KTM 1190 Adventure R | 2001 Suzuki DRZ-400E | 2020 KTM 500 XCF-W
Son's Bike:2019 Honda CRF250L
I'm here to serve as an example of what NOT to do.
Current Bikes:2007 Yamaha FJR1300AE | 2016 KTM 1190 Adventure R | 2001 Suzuki DRZ-400E | 2020 KTM 500 XCF-W
Son's Bike:2019 Honda CRF250L
I'm here to serve as an example of what NOT to do.
-
wheatonFJR
- Contributor
- I post more than I ride
- Posts: 20430
- Joined: Wed Jan 16, 2013 6:10 pm
- FJRModel: 2013-Jwilly Special LD Delivery
- Location: Travelers Rest
- x 43741
- x 18939
Re: Exhaust Gasket Install
Well duh!gixxerjasen wrote: ↑Thu Jul 14, 2022 9:17 pmJust remember, for safety reasons, you cannot do this with a full beer bottle. To get the best results, you really should be using a bottle that is very recently emptied.HotRodZilla wrote: ↑Thu Jul 14, 2022 3:22 pm The beer bottle flare is a good idea. I think if I can get the leading edge over the pipe, the rest will follow.
HotRodZilla loved this
boatanchor, 3rd class.
- gixxerjasen
- I post more than I ride
- Posts: 6022
- Joined: Thu Feb 21, 2013 5:50 pm
- FJRModel: 2007 Yamaha FJR1300AE
- Location: DFW
- x 5593
- x 9256
Re: Exhaust Gasket Install
Don't be rude, I didn't want poor Zilla ruining his expensive gasket on an old empty or risking injury on a full one. I'm looking out for the guy here.wheatonFJR wrote: ↑Thu Jul 14, 2022 9:22 pmWell duh!gixxerjasen wrote: ↑Thu Jul 14, 2022 9:17 pmJust remember, for safety reasons, you cannot do this with a full beer bottle. To get the best results, you really should be using a bottle that is very recently emptied.HotRodZilla wrote: ↑Thu Jul 14, 2022 3:22 pm The beer bottle flare is a good idea. I think if I can get the leading edge over the pipe, the rest will follow.
FJRPittsburgh, HotRodZilla, and wheatonFJR loved this
YouTube Channel | My Blog
Current Bikes:2007 Yamaha FJR1300AE | 2016 KTM 1190 Adventure R | 2001 Suzuki DRZ-400E | 2020 KTM 500 XCF-W
Son's Bike:2019 Honda CRF250L
I'm here to serve as an example of what NOT to do.
Current Bikes:2007 Yamaha FJR1300AE | 2016 KTM 1190 Adventure R | 2001 Suzuki DRZ-400E | 2020 KTM 500 XCF-W
Son's Bike:2019 Honda CRF250L
I'm here to serve as an example of what NOT to do.
- HotRodZilla
- Veteran
- Posts: 4452
- Joined: Sat Jan 19, 2013 1:09 am
- FJRModel: 07 FJR-A
- Location: Albuquerque, NM
- x 13000
- x 6299
Re: Exhaust Gasket Install
I 100% appreciate your concern for my wellbeing but am a little disappointed that you think I would either waste a perfectly good beer or waste the opportunity to just drink one.gixxerjasen wrote: ↑Thu Jul 14, 2022 11:43 pmDon't be rude, I didn't want poor Zilla ruining his expensive gasket on an old empty or risking injury on a full one. I'm looking out for the guy here.wheatonFJR wrote: ↑Thu Jul 14, 2022 9:22 pmWell duh!gixxerjasen wrote: ↑Thu Jul 14, 2022 9:17 pm
Just remember, for safety reasons, you cannot do this with a full beer bottle. To get the best results, you really should be using a bottle that is very recently emptied.
FJRPittsburgh, gixxerjasen, and wheatonFJR loved this
- HotRodZilla
- Veteran
- Posts: 4452
- Joined: Sat Jan 19, 2013 1:09 am
- FJRModel: 07 FJR-A
- Location: Albuquerque, NM
- x 13000
- x 6299
MRe: Exhaust Gasket Install
Yeah, so I was wrong. That's how long it has been since I tried this shenanigan last time.
The gasket fits over the header pipe perfectly. The problem is that the gasket is too big around for the muffler pipe to fit over it. I tried some heat and a pair of channel locks to open the pipe a hair, but I was sure I was gonna screw something up. I also burned the shit out of my finger. Did you know that after you run a torch over a stainless steel tube it is hotter than Satan's nut sack? Just FYI.
Anyway, that did not help as the outer diameter of the uncompressed gasket is slightly bigger around than the pipe. So, I took the pipe and the gasket to a muffler shop thinking they could flare the pipe enough to get the gasket to fit. The owner was super cool but was afraid to crack the pipe. So, I went to my Yamaha dealer to see how they do this.
They had NO idea. So, they called the older guy in the shop to the counter and we talked about how the pipe and gasket fit together. The guy who normally works on FJRs was on vacation. Jeez!
Having had these off before, I know the gasket is compressed between the pipes. So my idea is to cut open a soda can and wrap that around the gasket, while on the header pipe. Then I'm going to tighten pipe clamps around the soda can to compress the gasket as much as possible. The soda can is there to spread the force and hopefully not damage the gasket. This should help the fit.
The Bobby J's guy turned me on to an exhaust pipe expander at Harbor Freight. The one that will work for this pipe was $19. A little heat and a little bit of expansion may work just fine without cracking anything.
Harbor Freight actually had pipe clamps that are almost identical to the OEM FJR Exhaust clamps. I bought a set of those for $19. I'll use those to do the compression thing, then use the swedge for the expansion thing and hopefully with those two adjustments, this dammed gasket fits both onto the header pipe and into the muffler pipe.
We will see.
Anyone think either of these is a bad plan or have a better idea?? This is a stupid problem to have!
- FJRoss
- Veteran
- Posts: 2677
- Joined: Sat Apr 14, 2018 7:41 pm
- FJRModel: 2011 FJR 1300
2017 BMW F700GS - Location: Fredericton NB (Canada)
- x 815
- x 2398
Re: Exhaust Gasket Install
No idea what's going on. Shouldn't be that difficult - i certainly don't remember any drama the one time I replaced an exhaust gasket.
HotRodZilla loved this
-
wheatonFJR
- Contributor
- I post more than I ride
- Posts: 20430
- Joined: Wed Jan 16, 2013 6:10 pm
- FJRModel: 2013-Jwilly Special LD Delivery
- Location: Travelers Rest
- x 43741
- x 18939
Re: Exhaust Gasket Install
My idea is to have Ross do it.
0face, HotRodZilla, and FJRoss loved this
boatanchor, 3rd class.
- FJRoss
- Veteran
- Posts: 2677
- Joined: Sat Apr 14, 2018 7:41 pm
- FJRModel: 2011 FJR 1300
2017 BMW F700GS - Location: Fredericton NB (Canada)
- x 815
- x 2398
Re: Exhaust Gasket Install
Sure, bring it by and I'll get it fixed in no time!
I wonder if the gasket went into the muffler side and then slipped over the header pipe?
Or maybe they sold him the wrong gasket...
Edit: I did find this...
https://www.hondatwins.net/threads/how- ... ket.33360/
Edit again: Another reference
https://www.fjrforum.com/threads/muffle ... on.164099/
HotRodZilla loved this
- raYzerman
- Contributor
- I post more than I ride
- Posts: 9674
- Joined: Mon Mar 18, 2013 10:49 am
- FJRModel: 2010 Honda CBF1000FA
- Location: Millgrove, Ontario, CA
- x 3129
- x 11581
Re: Exhaust Gasket Install
Not sure you can compress the gasket.... what if you put the gasket inside the pipe first and then put it on the header pipe?
Keep yer stick on the ice........... (Red Green)
Duct tape can't fix stupid, but it can sure muffle the sound.
Duct tape can't fix stupid, but it can sure muffle the sound.
- Dale_I
- Squid
- Posts: 22
- Joined: Wed Sep 02, 2020 1:12 pm
- FJRModel: 2008 FJR1300 AE
- x 8
- x 39
Re: Exhaust Gasket Install
I've replaced mine a couple years ago with no drama at all. It almost sounds like there is still some old gasket in there??? I hate to ask, but are you sure all of the old one came out?
I remember having to work at getting all the pieces of the old material out. Between a flat bladed screwdriver and some large pointy-nose pliers I dug out all the pieces along with the metal mesh. Once removed, the new gaskets (I call them sleeves) slid into the mufflers and then over the pipes while twisting the mufflers with a little force, but nothing excessive and no damage.
I remember having to work at getting all the pieces of the old material out. Between a flat bladed screwdriver and some large pointy-nose pliers I dug out all the pieces along with the metal mesh. Once removed, the new gaskets (I call them sleeves) slid into the mufflers and then over the pipes while twisting the mufflers with a little force, but nothing excessive and no damage.
PhilJet09, wheatonFJR, and FJRoss loved this
2008 FJR1300 AE
IBR #79256 / STOC #5341
IBR #79256 / STOC #5341
- HotRodZilla
- Veteran
- Posts: 4452
- Joined: Sat Jan 19, 2013 1:09 am
- FJRModel: 07 FJR-A
- Location: Albuquerque, NM
- x 13000
- x 6299
Re: Exhaust Gasket Install
That's my problem Ray. With the size of the uncompressed gasket, I CANNOT get the gasket into the muffler side. When I changed the pipes, I remember the right side being pretty thin. I was surprised that the new ones are so thick. This gasket looks exactly like the one in Ross's first link. The guy's at Bobby J's checked the parts fiche and confirmed I do have the correct gasket.
Don't tempt me. Remember I have been using Kevlar gasket material and heat tape on this bad boy for 12+ years. Showing up on your door step would be just a drop in the bucket. Haha.FJRoss wrote: ↑Sat Jul 23, 2022 6:51 am
Sure, bring it by and I'll get it fixed in no time!
I wonder if the gasket went into the muffler side and then slipped over the header pipe?
Or maybe they sold him the wrong gasket...
Edit: I did find this...
https://www.hondatwins.net/threads/how- ... ket.33360/
Edit again: Another reference
https://www.fjrforum.com/threads/muffle ... on.164099/
The first thread you linked to is my problem exactly. I think a little expansion of the pipe and a little compression of the gasket will do it. With the Kevlar/heat tape jury-rig the pipe slid over, so I'm betting in order to get it tight, I compressed the pipe some. I am hoping the expander corrects that.
See my response to Ray about the gasket. I have the correct one. Maybe it is just that these are aftermarket pipes so need some finesse. I don't honestly know but I'll figure it out.
Haha. Ask away. Sometimes these things are solved because we're overlooking something.Dale_I wrote: ↑Sat Jul 23, 2022 9:28 am I've replaced mine a couple years ago with no drama at all. It almost sounds like there is still some old gasket in there??? I hate to ask, but are you sure all of the old one came out?
I remember having to work at getting all the pieces of the old material out. Between a flat bladed screwdriver and some large pointy-nose pliers I dug out all the pieces along with the metal mesh. Once removed, the new gaskets (I call them sleeves) slid into the mufflers and then over the pipes while twisting the mufflers with a little force, but nothing excessive and no damage.
Problem is, this muffler pipe never had gasket in it. It is an aftermarket two brothers. When I removed the OEM pipes, the gasket stayed on the header pipe on the right side. That one was easy. On the left, the gasket came off the header and stuck inside the muffler pipe. I tried to coax it out and failed. It would have required the same screw driver and pliers to tear it out of there. I stopped that day and ordered the new gasket. I destroyed that one trying to force it into this pipe.
Your post gave me a great idea. I was going to go grab the OEM pipe, see if this gasket fits and of so, install it, compress it, remove the pipe and install the new one. THEN I remembered, when we were organizing this new garage, I finally got sick of moving those pipes around all the time. So, I took them to recycle. I did that a few months ago. I just went to the garage to confirm I did that. Jeez. Sometimes I'm an idiot.
I might have tried that when this shenanigan first happened years ago. I can't imagine I wouldn't have tried that. Lol.
wheatonFJR loved this
- HotRodZilla
- Veteran
- Posts: 4452
- Joined: Sat Jan 19, 2013 1:09 am
- FJRModel: 07 FJR-A
- Location: Albuquerque, NM
- x 13000
- x 6299
Re: Exhaust Gasket Install
Well, THAT didn't go as planned and wasted like $60. What an absolute pain in the ass!
Here is the gasket that is as big around as the pipe it is supposed to fit into:
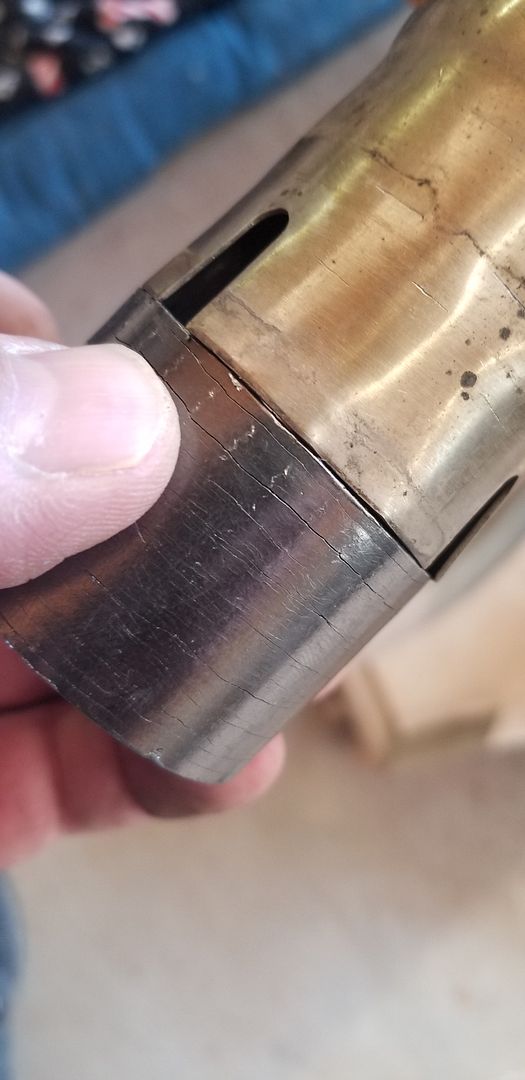
These should give you an idea of how thick the gasket is when new. My idea to compress it did NOT work.
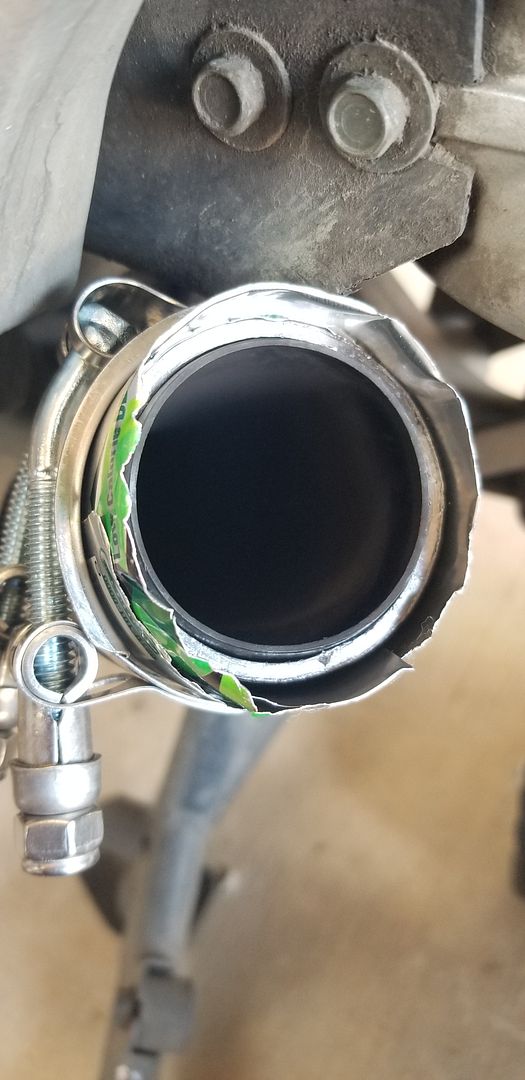
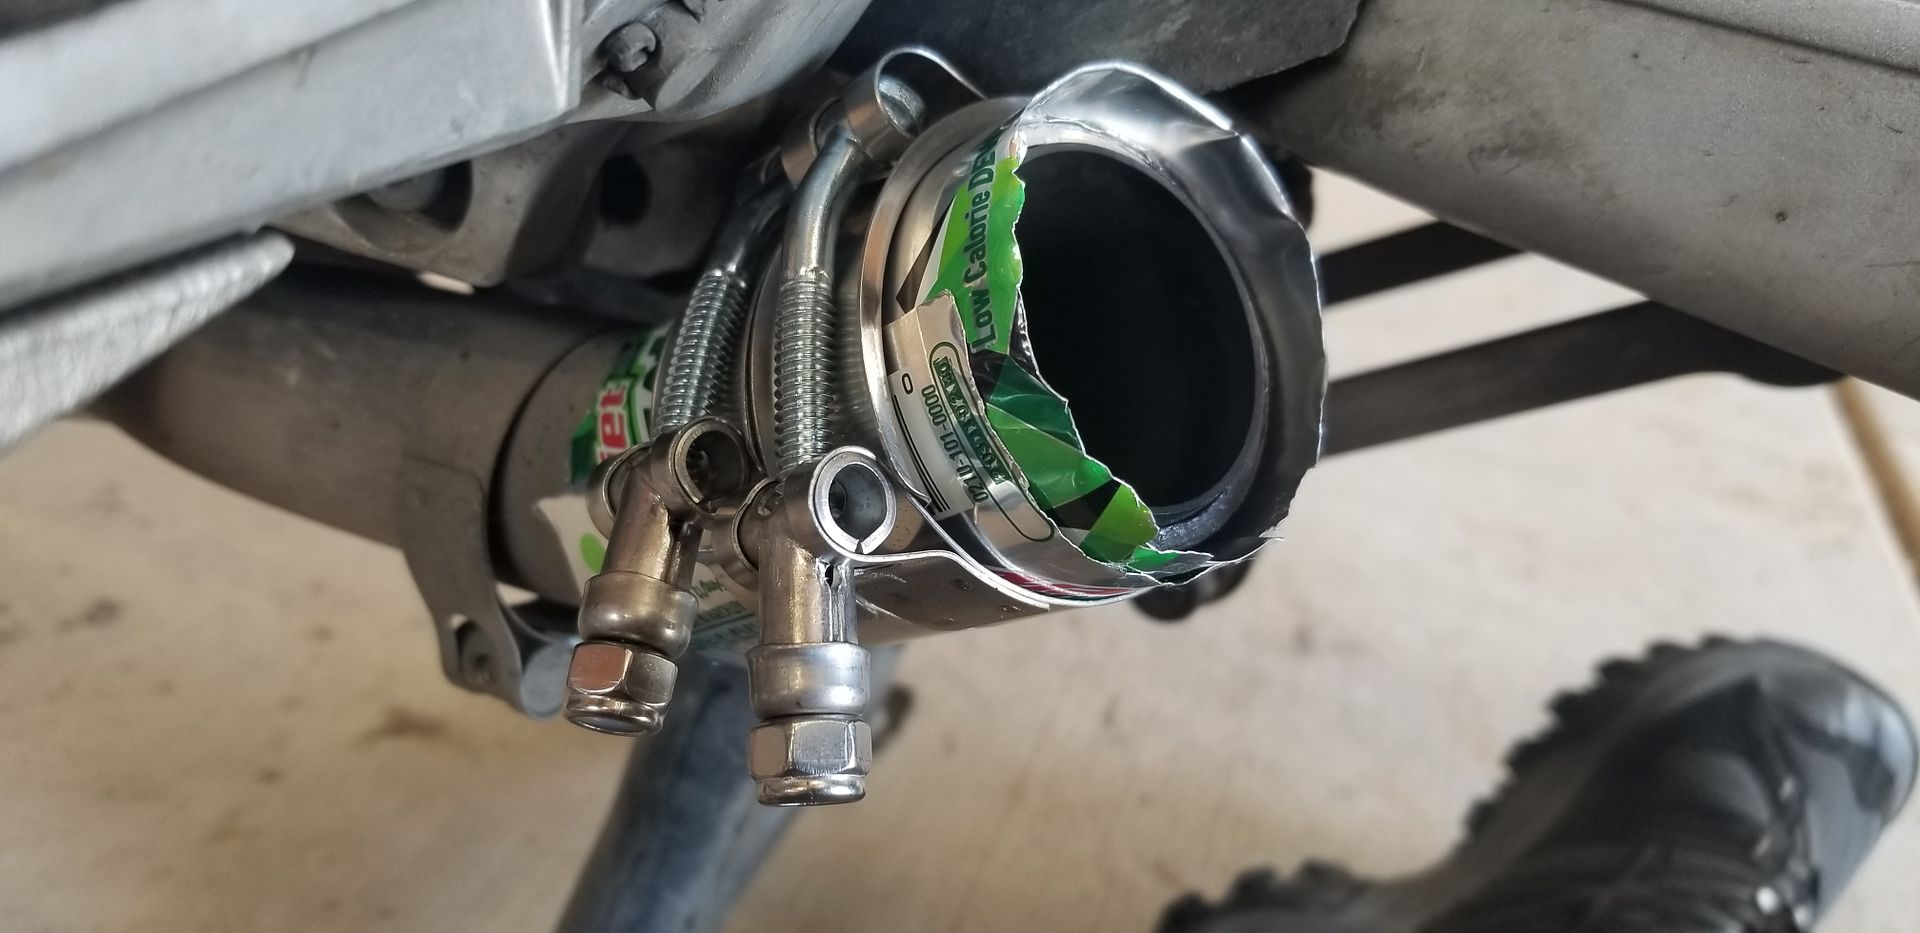
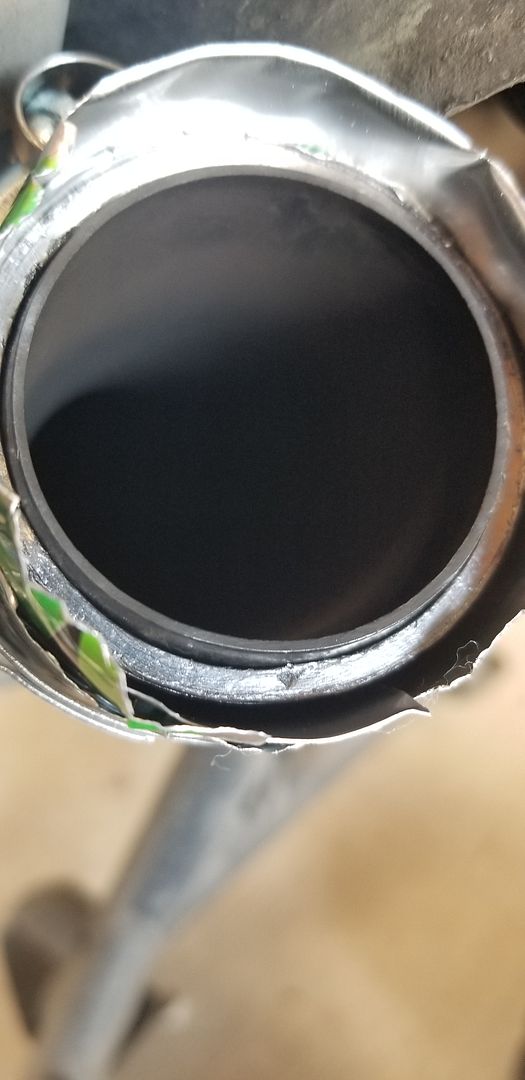
This is the gasket on the header pipe compared to the muffler pipe, after I had tried flaring the muffler pipe a couple times.
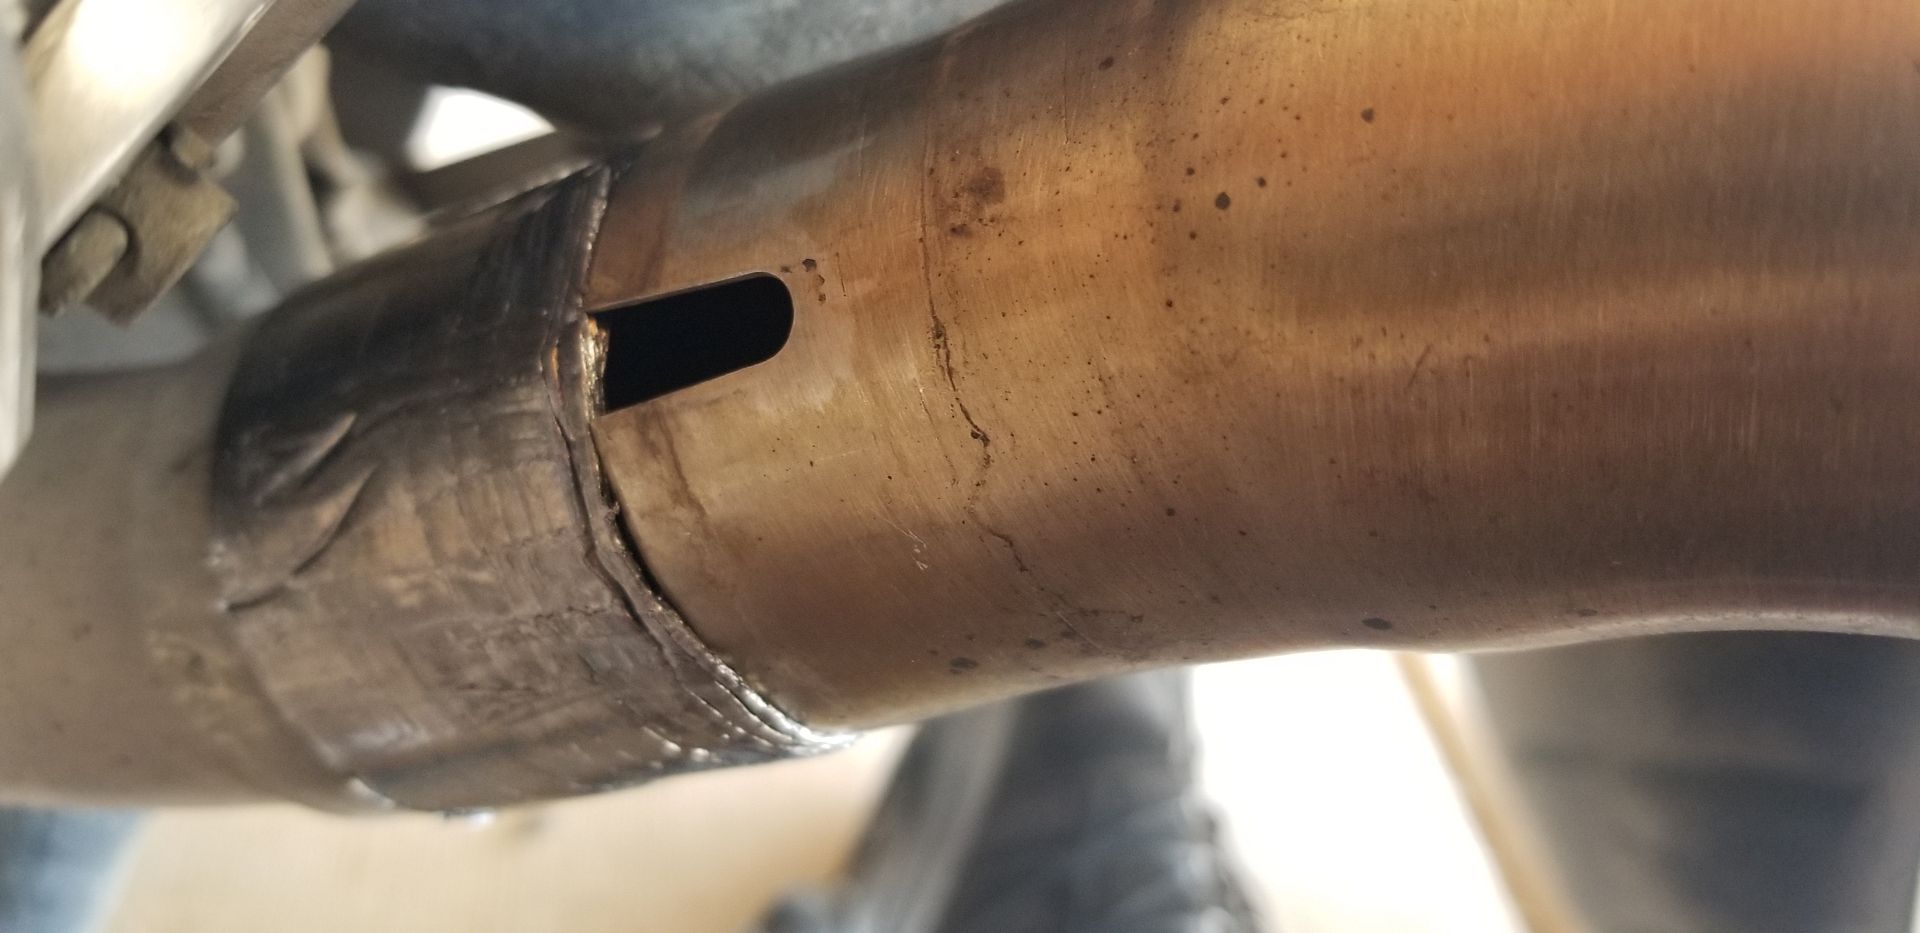
AND, after a lot of hoping, more cussing than anyone should do, more attempts at pipe stretching, attempts to "lube" the pipe etc., nothing worked. The muffler was not going to go over the gasket. It is just too tight. I could have tried to stretch it more, but if I would have split it at those notches, my problems would have increased a lot.
I eventually just tried to finesse the gasket into the pipe by hand. I moved slow and did nominal damage. That gasket was not made to be in that fitting. It basically buckled but I got it in. I tried to install the pipe with the gasket installed. All it did was peel parts of the gasket back. I even got the expander in the pipe with the gasket and tried to compress the gasket like that. Nope. That had almost zero effect.
I finally pulled the gasket out, peeled off any stray pieces and put it back onto the header pipe. I tried to gently get the muffler over the gasket and header and that did not work. I was calm, thoughtful and careful. I finally got pissed and decided it was going to fit whether it wanted to or not. It did not. Below is the result.
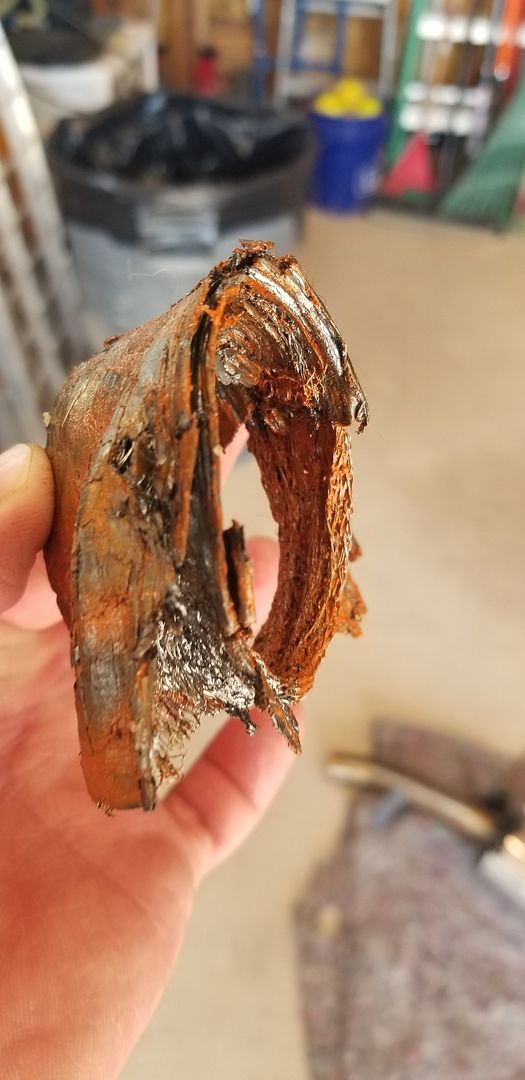
Remember, that was not just one single pissed off push. I got mad about half way into making the gasket look like that. Everything I tried just damaged the POS and never made it any better. I finally found a video of installing the pipe onto the header and it looks like it may just be a slip fit with no gasket at all. I don't know, but I used my old material and just put it back together. Screw it. There is zero point in being that irritated.
Here is the gasket that is as big around as the pipe it is supposed to fit into:

These should give you an idea of how thick the gasket is when new. My idea to compress it did NOT work.


This is the gasket on the header pipe compared to the muffler pipe, after I had tried flaring the muffler pipe a couple times.

AND, after a lot of hoping, more cussing than anyone should do, more attempts at pipe stretching, attempts to "lube" the pipe etc., nothing worked. The muffler was not going to go over the gasket. It is just too tight. I could have tried to stretch it more, but if I would have split it at those notches, my problems would have increased a lot.
I eventually just tried to finesse the gasket into the pipe by hand. I moved slow and did nominal damage. That gasket was not made to be in that fitting. It basically buckled but I got it in. I tried to install the pipe with the gasket installed. All it did was peel parts of the gasket back. I even got the expander in the pipe with the gasket and tried to compress the gasket like that. Nope. That had almost zero effect.
I finally pulled the gasket out, peeled off any stray pieces and put it back onto the header pipe. I tried to gently get the muffler over the gasket and header and that did not work. I was calm, thoughtful and careful. I finally got pissed and decided it was going to fit whether it wanted to or not. It did not. Below is the result.

Remember, that was not just one single pissed off push. I got mad about half way into making the gasket look like that. Everything I tried just damaged the POS and never made it any better. I finally found a video of installing the pipe onto the header and it looks like it may just be a slip fit with no gasket at all. I don't know, but I used my old material and just put it back together. Screw it. There is zero point in being that irritated.
- raYzerman
- Contributor
- I post more than I ride
- Posts: 9674
- Joined: Mon Mar 18, 2013 10:49 am
- FJRModel: 2010 Honda CBF1000FA
- Location: Millgrove, Ontario, CA
- x 3129
- x 11581
Re: Exhaust Gasket Install
Is that an OEM muffler pipe? I can see you weren't going to be successful... gasket too big or pipe too small...
If it helps and if you get an exhaust leak.... Delkevic sends a small tube of gasket sealer with their systems. It is an orange-ish red RTV, obviously hi-temps stuff, you "lube" the joint first, then install, clean up any squeeze-out.... doesn't take much.... apparently JB Weld and VersaChem make some sealer......
If it helps and if you get an exhaust leak.... Delkevic sends a small tube of gasket sealer with their systems. It is an orange-ish red RTV, obviously hi-temps stuff, you "lube" the joint first, then install, clean up any squeeze-out.... doesn't take much.... apparently JB Weld and VersaChem make some sealer......
Keep yer stick on the ice........... (Red Green)
Duct tape can't fix stupid, but it can sure muffle the sound.
Duct tape can't fix stupid, but it can sure muffle the sound.
- HotRodZilla
- Veteran
- Posts: 4452
- Joined: Sat Jan 19, 2013 1:09 am
- FJRModel: 07 FJR-A
- Location: Albuquerque, NM
- x 13000
- x 6299
Re: Exhaust Gasket Install
No. Not OEM pipe. This is a Two Brothers I bought new and installed October of 2013. I know this because I just found the YouTube video I made. Haha.raYzerman wrote: ↑Sun Jul 24, 2022 8:16 am Is that an OEM muffler pipe? I can see you weren't going to be successful... gasket too big or pipe too small...
If it helps and if you get an exhaust leak.... Delkevic sends a small tube of gasket sealer with their systems. It is an orange-ish red RTV, obviously hi-temps stuff, you "lube" the joint first, then install, clean up any squeeze-out.... doesn't take much.... apparently JB Weld and VersaChem make some sealer......
I just did my normal homemade gasket that has been working for the last 8.5 years. I finished that up about 11pm last night after it got cooler here and I was no longer irritated. Went together just fine and runs beautifully. No exhaust leaks and everything is tight. Just the way I like it.
BTW, the orange goop on that destroyed gasket is Permatex silicone gasket maker with copper in it. It is specifically made for exhaust gaskets. The way my invention fit together. There was no need for that though. Maybe next time.
FJRPittsburgh, PhilJet09, raYzerman and 1 others loved this
- Bust
- Veteran
- Posts: 2227
- Joined: Sat Jan 19, 2013 12:08 am
- FJRModel: 68' Schwinn Stingray
- Location: Owosso Mi
- x 6167
- x 1767
- Contact:
Re: Exhaust Gasket Install
All I can add here is you should have been wearing your assigned helmet and drool cup they gave you on the short bus ya retard!
And now, back to our regularly scheduled programming.
And now, back to our regularly scheduled programming.
FJRPittsburgh and HotRodZilla loved this
You ever see a grown man naked Billy?