To help you understand why it is recommended to cycle the ABS system when you perform a brake fluid flush and bleed, this is a brief overview of the ABS system. Refer to the Yamaha Service Manual, General Information for more complete description of the ABS system’s operation.
The following is a Gen 1&2 ABS Block Diagram up to 2007 (North America). In 2008, the ABS system was improved, and further changes were made for Gen 3 2013 onwards, but essentially the fluid paths are functionally similar.

In normal braking without ABS, the fluid is passed through the ABS system, bypassing the ABS fluid circuits between points 5, 6 and 7. Fluid here becomes stagnant, and if dried up, can become like a blood clot in an artery if ABS is not activated. Subsequent ABS activation may not allow fluid to pass through these circuits, or can migrate downstream potentially causing blockages in the proportioning valve (8), metering valve (11) or in the lines, preventing proper fluid flow. Regular flushing and bleeding, along with ABS activation with the test harness will put fresh fluid in all the circuits.
FJR 1300 ABS Test Harness Instructions Jan. 2019
This test harness can be installed and left on the bike for convenience to cycle the ABS system when flushing and bleeding the brake fluids, or optionally removed after the test. The following instructions are for a permanent install. For additional reading, refer to the General Information section of the Yamaha Service Manual for ABS system operation, and the information following these instructions.
1. Remove instrument panel cover on Gen 3, battery cover, or if Gen 1&2, right side IP cover.
2. Locate ABS test connector in near the Red+ battery connection. Insert a thin blade in between metal stay and middle rib on connector to unlock it, then pull rearward to release.
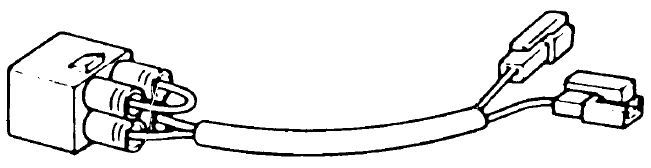
3. Remove dummy connector with 4 black waterproof plugs, then with a pin or wire, push out two of the black waterproofing plugs. Insert the two plugs into the two open ports on the test harness connector.
4. Route test harness wire forward and loop around the outboard side of the battery, avoiding anything sharp that may abrade or damage the harness over time. Plug in to bike’s ABS connector and re-install on the metal stay, adjust wire routing as necessary.
5. Find an appropriate location for the test switch and connect switch (polarity unimportant). Suggest near/beside the bikes fuse panel where it won’t get accidentally switched on, use a wire tie to hold the harness/switch in place, adjust routing for any excess wire length. See photos for suggested routings.
6. After ABS test, turn Ignition OFF and ensure test harness Switch is in the OFF ‘O’ position, then replace instrument and battery covers.
7. Optional, for a temporary use, unplug the test harness and replace the dummy connector.
ABS Test Procedure
Ensure the battery voltage is >12.8 volts or the test may not work. When testing/cycling the ABS system, first flush and bleed the brake system normally until you have fresh clear fluid in the system. Then with Ignition OFF, turn test harness switch ON. Simultaneously, hold moderate pressure on rear brake pedal and front brake lever, and turn Ignition ON. ABS system will cycle (pulse) twice in rear brake and once in front brake. Recommend repeating the test. This sends fresh fluid into the ABS fluid circuits within the pump, which are normally unused/bypassed unless ABS has been activated (see ABS Block Diagram).
Optional – To ensure old fluid has been pushed out of the ABS fluid circuits, on right front caliper, bleed a small amount (~tbsp) of fluid at upper bleeder (front brakes), then lower bleeder (rear brakes). Repeat ABS test cycle, then shut the test switch OFF and place it such that it won’t be accidentally switched on when the battery cover is re-installed.
Recommend flush, bleed and ABS activation annually to prevent any dried up fluid from blocking the ABS fluid circuit. It is also recommended to flush and bleed the clutch annually.
Gen 2 Test Harness Routing (fairing pulled out for clarity)

Gen 3 Test Harness Routing (with other accessory wiring)